


Alerts
A convient way of telling the viewer a message after they click a link (and before they are taken to the page) is to use a JavaScript Alert ... EXAMPLE:
It's very easy to do... just add the onClick attribute to your anchor tag and set it's value to the JavaScript ALERT function ...like this:
Be SURE all your quotes and spacing is EXACTLY as follows:
<a href="URL" onClick="alert('Put your message here')">Link Text Here</a>
If you change the onClick to onMouseover... you'll get this:
You cannot effectively build web pages without knowing and using the keyboard methods of Cut, Copy and Paste... to learn about Cut, Copy & Paste search Google for " cut copy paste"!
Webpages can be significantly enhanced and can become more useful to the viewer by incorporating CGI Scripts in their Source Codes... To understand more about how to use CGI (Common Gateway Interface) Scripts for a webpage, Read This Information
 You can achieve more complete layout control by using a little CSS Positioning... To understand more about how to use CSS Positioning for a webpage, Read This Information and This Information
The EXAMPLE Here Of CSS Positioning is the Yellow Hand, to the left of this, pointing towards this text... it is placed EXACTLY at that point on the web page, using these codes:
In The Head Section [NOTE: Image Size is width=67px height=39px]:
<!-- the following for positioning the pointing hand outside the container -->
<style>
img.one {
position:absolute;
left:-67px; bottom:0px;
}
</style>
And at the Code Location for and within the container:
<p style="position:relative;">
<img class="one" src="/images/finger_rt.gif">
You can achieve more complete layout ...
</p>
NOTE: The container MUST have "position:relative;" before the image can be placed with "position:absolute;"
For PC Users only, if you Bookmark this page and then Browse away from the page, then Browse back and Refresh, and then if you look up into the
Address Bar on your Browser for this page, you'll see a small
Icon to the left of the page address... this is our Favicon for this page! It also appears
in your Favorites folder if you Bookmark this page!
You can make one for your page by using any Image Editor, but it MUST be 16x16 pixels in size and have a file type of .ico
You can use IrfanView to convert your Image files to .ico type!
Most popular Browsers will find the Icon if you place this HTML Code into your <head> section:
<link rel="shortcut icon" href="address_to_your_icon_image" type="image/x-icon">
Read more about Favicons at A Free Favicon Generator ... Good Luck!
Forms are useful when you want to Interact with your readers and Forms take on many shapes and styles such as Text Input Boxes, Textarea Input Boxes, Check Boxes, Radio Buttons, Drop Down Menus etc...here's an example: (NOTE: The info will NOT submit since we have DISABLED the Form Action!)
Join My Webpage Design Contest ... Please Enter Your Info Here ... Please Only ONE Entry Per Webmaster:
Forms are created using HTML Form Tags but Forms
need a Script (usually a CGI Script) to PROCESS them!
You should take some
time to
Understand The
Complete Information about Forms!
You should also Read My Form Mail Tutorial for more information...
AND if your server doesn't allow or supply you with CGI Form Mailer Scripts (to Process the Form and Email the input data to you) then try a Remotely Hosted one at Jotform ... they are Fully Customizable and Reliable!
NOTE: Using a simple Form Action of "mailto: ..." to Process a Form is NOT accurate and NOT cross-browser reliable and must NOT be used!
Using an FTP (File Transfer Protocol) Program to copy your HTML Documents back and forth from your PC to your online Web Host Server is fairly easy... I have written an FTP Tutorial which you should read to help you along...
Gradiant Colors can be used with the following codes:
Internet Explorer
style="background-image:linear-gradient(to bottom,#ffffff 0%,#adeaea 100%)"
Mozilla Firefox
style="background-image: -moz-linear-gradient(left, #FFFFFF 0%, #00A3EF 100%);"
Webkit (Safari/Chrome 10)
style="background-image: -webkit-gradient(linear, left top, right top, color-stop(0, #FFFFFF), color-stop(1, #00A3EF));"
The "to bottom" can be set to other values for other flow directions...
You can apply the style to any element that has "layout" ie elements that have width and height, but it is best used with table cells, form inputs or div elements:
<td style="background-image:linear-gradient(to right,green 0%,yellow 100%)" >
You can see an Example of Gradient Colors in this HTML Table, which has a normal Green background color, but which will flow to Yellow!
Please read the .htaccess Guide for information on using a .htaccess file on your Host Server...
There are a few ways to make Horizontal Lines for a webpage...
Use the HTML Tag <HR> with it's attributes: noshade, invertborder, align, width, size and color... NOTE: Some of these attributes are not supported on every browser! Here are some Examples with the code below each:
<hr style="width:50%;">
<hr style="width:100px;border-bottom:3px dashed red;">
<hr style="width:150px;height:75px;background-color:green;">
It's important to understand the process that takes place (in a few seconds) when you request a webpage, by typing the URL into your address box, or by clicking a link etc.
Please refer to the diagram below and read the information listed below the diagram...
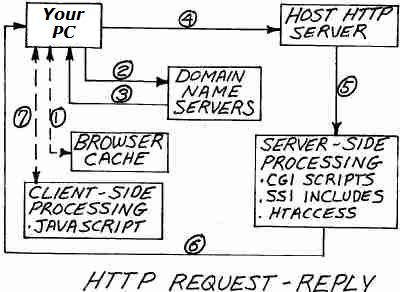
- A Webpage Request is made by the Client's User Agent (Browser)... by typing the URL (Webpage Address) into the Browser's address box, or by clicking a link, etc. First the User Agent (Browser) checks to see if the Webpage URL is stored in it's Cache (Temporary Files Directory)... if it is there, the Browser loads the Webpage for viewing...
- If the URL is not Cached, the Webpage Request is passed to a local Domain Name Server, which finds the Web Host Server where the URL is located on the WWW (thru several steps)
- The local DNS passes that Host Server location back to the Client
- The Client accesses the Host Server... If that Host Server is "Up and Running" it accepts the Request and finds the URL file, if the Server is "down" the Browser renders an Error Message, or if the Webpage cannot be found on the Server, or if any other errors are found, the Server sends an Error message back to the Client's Browser...
- The Webpage Source Code is interpreted by the Host Server, and any Server-Side Scripting is processed, including Redirects, SSI Includes etc.
- The final Server Reply is passed back to the Client's Browser
- The Browser interprets the Webpage Source Code and any Client-Side Scripting is processed (like JavaScript)... and the final Webpage is rendered in the Client's Browser and is added to the Browser's Cache (unless Caching is disabled)...
NOTE: This entire process is repeated for every element on the webpage that has it's own URL... Images, Remote Stylesheets, Remote Javascripts etc. ...however a certain "keep-alive" time period is created which eliminates several of these steps for repeated Requests...
Please Watch This You-TUBE Video which helps EXPLAIN this action...
And Please Watch This You-TUBE Video which helps EXPLAIN this action...
If you want to create Links within a specific IMAGE on your page...(This is called Image Mapping)...
Put these codes into your source (for "Client Side Image Maps") NOTE: Be advised that Search Engines CANNOT follow Image Map Links:
<img
src="URL of Image Here" width="?" height="?"
usemap="#mymap1" alt="image map">
<map name="mymap1">
<area shape="rect" coords="x,y,X,Y" href="URL of First Link
Here">
<area shape="rect" coords="x,y,X,Y" href="URL of Second Link
Here">
</map>
IMPORTANT: The values (x,y) are the upper left corner coordinates for where you want your LINK BOX OUTLINE to appear...and the (X,Y) are the lower right corner coordinates for the box! ["x or X" being the Horizontal cooridinate, and "y or Y" being the Vertical cooridinate]
To find these coordinates on your Image... you can search Google for an Image Mapper...
You can make as many Links as you want within your image (be reasonable)...if you want to Image Map another Image on the same page you must use a different name for the new map such as "mymap2" etc.
Want to know how to link from one place on a page...to a different place on the same page...
This is called INTERNAL LINKING and is done by "naming" the link at the place where you want the link to goto...
To "name" the link, do this at the exact PLACE in the source code, where you want the link to goto:
<a id="name1"></a>
THEN make a link to that place (from anywhere else on the same page) like this:
<a href="#name1">LINK TEXT HERE</a>
IN ADDITION: You can now link to that place on the that page FROM ANY OTHER PAGE by putting a link on any other page like this:
<a href="URL of THAT PAGE#name1">LINK TEXT HERE</a>
Just add #name1 to the very end of the URL...let's say the URL is http://davmagic.com/PAGES38.html then you would write it like this:
http://davmagic.com/ PAGES38.html#name1
For more links, just change the names to name2, name3 etc. but be sure to match them up correctly...remembering case sensitivety!
A simple way to change the color of your link text for a specific link is to insert the SPAN tag within the Anchor Tag and use the STYLE Attribute for the SPAN tag, to indicate a color for the text... this is called using CSS (Cascading Style Sheets) code:
<a href="URL"> <span style="color:#??????">Link Text</span></a>
A better way is to use the STYLE TAG (CSS code) and create a "class" for the specific link colors ...then assign that link to the class! So in your HEAD Section put:
<style>
a.myname:link { color: green } a.myname:visited { color: yellow }
</style>
Use whatever color values you want... then write your link like this in your BODY Section:
<a href="URL" class="myname">Link Text</a>
The default setting for most Browsers is to have all the text links UNDERLINED... to eliminate the underlining put this CSS code in your HEAD section:
<style>
a:link, a:visited {text-decoration: none}
</style>
Then if you want to CUSTOMIZE your non-underlined links, with a Custom Underline, when the mouse is over them, or in the static state or both... Read This Information
Here's my "cool" example: Mouseover This Link
Another KOOL CSS way to underline ANY regular text and control the color and thickness and style of the underline:
<span
style="border-bottom:3px dotted green;">
Your Text Here</span>
Example: Some of Your Text Here to be custom underlined (just change the thickness, color or style in the CSS to suit your taste!)
If you have a one cell table with a link in it, it will look like this:
| Home |
Notice how you have to point your mouse over the link TEXT to get the link to become active...
By using a little CSS (Cascading Style Sheets) code, namely the "display" property, you can make the whole single cell table linkable... Now point your mouse anywhere in the cell below, and the link becomes active:
| Home |
Just write your link like this:
<a style="display:block" href="URL">Link Text</a>
Before I discuss real JavaScript MouseOver Effects using Images, here is a method using the STYLE TAG and CSS Coding that will give the effect of having a color change for text or background behind text when the mouse is moved over a text link:
Now put your mouse over the Dummy Link below to see the effect:
Notice how the color changes and an underline is added... Here is the code that goes into your Head Area:
<style>
<!-- .one {color: #6699ff}
.one:hover {color:#ff9933; text-decoration:underline;}
-->
</style>
And then write your link like this:
<a class="one" href="URL">TEST LINK</a>
Find help on CSS AT THESE SITES
If you want to have a Form
Box on your page that will show information when you pass your
mouse over a link:
SEE EXAMPLE
First put this JavaScript into your HEAD section:
<script>
<!-- Begin function atext(txt)
{ document.aform.atext.value = txt return true;}
// End --> </script>
Now add this Form box to your Body section where ever you want...you can change it's size by changing the variables...
<form
name="aform">
<input type="text" name= "atext" size="40" value="Put Your Text
Here">
</form>
Now write your Links like
this:
Be sure there are NO spaces within your (a
href....) tag!
<a href="URL"onMouseover= 'atext("Text") 'target= _top>LINK</a>
If you want to have an
Image Change to another Image and then Back...when you Mouseover
and Mouseout
SEE EXAMPLE
First put this code into your HEAD section:
<script>
<!--
Begin
function move_in(img_name,img_src) {
document[img_name].src=img_src;
}
function
move_out(img_name,img_src) {
document[img_name].src=img_src;
}
// End
-->
</script>
Then put this code into
your BODY section for each place where you want a mouseover effect
but be sure for each new mouseover effect to give each image a new
name...(name="button2") (name="button3")...and include that name in
the onMouseover/onMouseout tags!
Be sure there are NO spaces within your (a
href....) tag!
<a
href="URL Here" onMouseover="move_in('button', 'firstimg.gif')"
onMouseout="move_out('button', 'secondimg.gif')">
<img name="button" src="secondimg.gif" width="???"
height="???"></a>
SUBSTITUTE your own URL's for the "firstimg.gif" and "secondimg.gif" and make them the same size...
OR... you can avoid using a separate script, and make use of the browser's built-in javascript code "this.src" by writing your link like this:
<a href="url"><img src="image_1.gif" onmouseover="this.src='image_2.gif'" onmouseout="this.src='image_1.gif'" width="xxx" height="yyy" border="0" alt="Text" /></a>
By using Iframes you can insert one HTML page INTO another HTML page and achieve many desired results... one of which is using an Iframe to insert a set of text at a particular place on a page, that perhaps appears on that place on MANY of your pages... then to make a Design Change to these pages, you only need to change just that one HTML page! This is SIMILAR to SSI Includes but with one BIG difference, which is that no server SSI action is required, only browser action, and almost ALL Current browsers support Iframes!
It should be mentioned that most Search Engines cannot follow links that may exist within an Iframe or even index any content therein!
The basic HTML is:
<iframe src="URL" width="xxx" height="yyy"></iframe>
Much more Information is available Here ...or as always just Search Google!